Monday, June 08, 2009

Hamida's House
June 8, 2009

I have sad tidings today. My boua's village house was completely destroyed by hurricane Alia. Her parents, two brothers, and two young sons are now all living together in a tiny one room jute hut. Hamida's possessions are bundled together outside under a makeshift shelter. With the monsoon season upon us, the living conditions are quite desperate.

Hamida has tried to go to a bank to get a loan, but they would require her to repay the loan in 6 months, something which she just can not afford to do. I am trying to help her out as best I can, but because all of my money is tied up in my company right now, I am unfortunately not able to offer as much assistance as I would like. Consequently, I am asking my friends and family to contribute anything they can. I am trying to help her raise $1,500 to rebuild her home. If you can find it in your heart to donate something (even $25 helps), please click the "donate" button below. The money will go to my personal account, then I will withdraw the money in taka and give it to Hamida to rebuild her home.

I will keep track of how much money that we have raised and I will report on how the money was spent here on my blog. Please click here to donate! (You can pay by credit card or PayPal.)


Here are some photos of her home:

Hamida and Her Brother
A photo of Hamida and her brother with what remains of her house in the background.


Hamida's Possessions
All of her things are tied together outside, exposed to the monsoon rains.


Hamida's Old House
What remains of their old house.


One Room House
This is the small jute house where Hamida's parents, her two brothers, and her two young sons currently live.


Hamida thanks you for your support!!

Monday, June 01, 2009

Company Formation in Bangladesh - Part VI
Amending Your BOI Registration
June 1, 2009

(For an index of all of my Company Formation in Bangladesh blogs, click here: Forming a Company in Bangladesh)

On the back of my Bangladesh Board of Investment (BOI) registration letter it says that I need to get prior permission from the Board of Investment to change anything material about my company, including the ownership. Since I will be selling shares to raise equity for my resort, I went to the BOI yesterday to find out what the procedure for that is. Apparently I don't need approval before I change the ownership, I just need to file for a registration ammendment.

When I first registered my company, my sister and I were the only two owners, so I had to register the company as a 100% foreign-owned. Some of my investors will be Bangladeshis, however, so I now need to change the type of company to a joint venture company.

In order to ammend my BOI registration I need to submit the following to Deputy Director Jebun Nessa:
  • Cover Letter - addressed to the director (Mamdood Alamgir) requesting a registration amendment
  • Revised Form 117 or Form 12 from the Joint Stock Registrar - this should list the old/ existing owners and the new owners
  • Joint Venture Agreement with Stamp - this should be between the original person and the new person. Needs to outline who gets how many shares as a percentage and what the roles of the new investors will be (i.e. shareholder, board member, etc.)
  • Particulars of the Shareholders - chart of all of the shareholders that includes: name, address, designation (i.e. "shareholder" or "managing director"), nationality, and equity percentage
  • Decision of the Board of Directors - minutes with date outlining the decision to change the ownership from 100% foreign owned to joint venture which includes the names of the new shareholders, position, etc.
  • Amendment Fee of 1,000 Tk - needs to be a pay order or bank draft made out to: "Executive Chairman and Member Secretary BOI"
  • Passport Copies - of all of the new shareholders. She said this was optional, but I think it is better to submit it; probably just the first page with the photos and particulars is sufficient.
  • Copy of the Original BOI Registration Letter - she didn't mention this, but I think that it would facilitate them finding your file. (I would staple it to the back of the cover letter.)


Sunday, May 17, 2009

Company Formation in Bangladesh - Part V
Investor Visas and Work Permits
May 17, 2009

(For an index of all of my Company Formation in Bangladesh blogs, click here: Forming a Company in Bangladesh)

In order to apply for my work permit, I needed an investor visa; in order to apply for my investor visa, I needed my Board of Investment (BOI) registration letter. As I mentioned in my previous post (Company Formation in Bangladesh - Part 4: BOI Registration), I submitted my BOI registration documents. They told me it would be ready in 10-12 business days, so I went back about 15 business days later to pick it up. They hadn't even started it. They told me to come back in two days; which I did. Again, they hadn't even started it and told me to come back in two more days.

Though I was quite annoyed, I remained positive and upbeat, but I firmly refused to leave that day until they had given me the BOI registration letter. I sat in Deputy Director Mizanur Rahman's office until he got annoyed and kicked me out. (For the Industrial Side of the BOI, this is who you talk to about getting BOI registration.) Then I followed my registration folder around making sure that it got to the next person in line andthat it never sat on anyone's desk longer than a few minutes. They were all very annoyed with me, but I was always friendly, so they didn't get angry. The document was almost done, but then the power went out at 4:30pm. I knew the power would not come on again before they left at 5pm, so I reluctantly agreed to go home that night after making them promise me that they would finish it first thing the next morning.

The next day I came back at 10:00am (a half an hour before the BOI opens to visitors) and again sat in the manager's office until I did finally get my registration document around 1pm.

With my BOI Registration Letter in hand, I was ready to apply for my investor visa ("PI Visa").

Investor Visa
You apply for your investor visa at the Board of Investment. It is on the same floor as registration (18th Floor), but you need to speak with Deputy Director Nafriza Shayma. Fortunately, she does seem genuinely concerned if you do not get your documents in the alotted time. Unfortunately, her staff is not as on top of things as she is.

To apply for your investor visa, you need to submit the following to Nafriza's department:
  • Cover letter addressed to Mamdood Alamgir (for the Industrial side of BOI) explaining that you are applying for a PI visa which lists the documents that you are submitting; also say where the letter of recommendation should be sent. It can only be to one location and it needs to be to a Bangladesh embassy or consulate in your home country (i.e. "the Bangladesh Embassy in New York.) (You need to return to your home country to get your investor visa. You can not get it in Bangladesh and you can not get it in a nearby country like Thailand or India; believe me, I tried!)
  • Copy of the BOI Registration Letter
  • Copy of the decision of the Board of Directors of your company to employ you (needs to be signed by the Chairman and Managing Director and stamped with your corporate seal.) This letter must list your name, what position you will have, your annual salary, housing allowance, "dearness" allowance, overseas allowance, house rent, conveyance allowance, entertainment allowance, bonus, other fringe benefits, monthly expenditure for household expenses like servants, car, club subscriptions, etc., and any remittance. (Only list those items that are applicable.)
  • Copy of your company memorandum & articles of association
  • Photocopy of your passport (all of the pages)
  • Several attested (signed and stamped with corporate seal) passport photos
They told me it would take 7-10 days to complete. I came back on the 11th day, and of course it was not done. So again, I waited all day and Nafriza made sure that her team finished it for me that day. (She was quite polite and offered me tea which made waiting much less frustrating than the first time around.)

After I had the letter, I had to go back to the U.S. to get my visa. I went to the Embassy in New York. To apply for my visa in New York, I needed:
  • Local Visa Application Form
  • Cover letter explaining why I wanted the visa. I included all of the particulars of my company: company name, company address, names of managing director and chairman, certificate of incorporation number, trade license number, tax ID number, and BOI registration number. I also wrote a flowery paragraph about how much I love Bangladesh and its people. (Which I did on recommendation of a friend and I am happy to say that it was so well received that I was given a five year investor visa when I was told that it was only possible to get a one year visa when I applied!)
  • Several passport photos
  • Copy of the BOI letter (BOI sends it directly to the Embassy, but it is good to submit a copy along with your application just in case it didn't arrive.)
  • Copy of my resume
  • Money order for $131 (check the visa fees in your country as they may vary)
I dropped off the visa application form in the morning and was able to pick up my visa in the afternoon. Unfortunately, they made a mistake on my visa and stamped it to say that "working was prohibited" which of course negated the whole point of the visa, so I needed to go back the next day and have them redo it. (Fortunately I checked before I left the country!!)

Work Permit
Upon returning to Bangladesh I was (finally!) ready to apply for my work permit! Two days after I got back, I went back to BOI and submitted the following paperwork, again to Nafriza's department:
  • Cover letter addressed to Mamdood Alamgir (for the Industrial side of BOI) explaining that I was applying for a work permit and listing all of the documents that I was submitting
  • Four copies of the Work Permit Application Form (with passport photos attached)
  • Copy of my BOI Registration Letter
  • My resume
  • Decision of the Board of Directors regarding my employment (see Investor Visa section above)
  • Full copy of my passport (all pages, including my new investor visa)
  • Pay order for 5,000 Tk (see below)
Again they told me it would be 7-10 business days. When I returned 14 days later, again, it was not done. They told me that I needed to submit a pay order for 5,000 Tk. Annoyed I asked them why they didn't tell me this before and they said that I only needed to pay it if my application was approved. So my advice to you is to call Nafriza 3-5 days after you submit the application and ask if you now need to bring down a pay order. Or, assume that your application will be accepted and submit the pay order when you apply. (Though I am not sure they will accept it from you at this point...)

You can get the pay order downstairs at The City Bank in the BOI building. Just go first to the side WITHOUT the tellers and tell them you need a pay order. They will fill out some paperwork and direct you to the teller side to pay. Pay for the pay order, then bring your papers back to the non-teller side and they will issue the pay order to you.

After I submitted the pay order, the man who works for Nafriza told me to come back in three days. Of course, I didn't listen to him and I waited to speak to Nafriza herself. When I did, after a bit of coaxing she agreed to push through the paperwork that day and about two hours later I had my work permit!

I have discovered that the best way to deal with the BOI is just to schedule several days to go down there and wait for all of your paperwork to go through. Sit in the hallway so that everyone sees you as they go by. Be polite, but resolute that you will not go until everything is done. Give them the time they say it will take (i.e. 10 days), but go on day 11 at 10:30am when they open and tell them that you won't leave until you get your documents. Then sit there all day (bring food, water, and some form of entertainment with you!) Every 30 minutes ask what the status is of your paperwork to make sure that it doesn't just sit on someone's desk collecting dust.

Opening Your Bank Account
So today I FINALLY opened my bank account! I went down to my bank (HSBC) and submitted my tax ID, trade license, BOI registration letter, and work permit to my banker. She told me that she would open my account by the end of the day and mail me my checks. (My banker is VERY efficient!)

When I commented on how convoluted the company/ bank account process is here, she told me that because of the craziness that I went through with my bank account, they talked to the Board of Investment and made it standard procedure to open a non-operating bank account for people who are trying to set up companies. (If you recall, I had to get special permission to open mine...) Well at least going through this process improved the system a tiny bit!

Conclusion
I would love to say that this will be my last company formation post and that I will no longer have to deal with the BOI since my company is now registered, but (alas!) I still have to apply for my liquor license. Plus, I need to get prior approval from the BOI to change ownership of the company, which means that whenever I get a new investor I need to talk to the Board of Investment first. So, alas, I am afraid the saga is not over yet...

Friday, May 08, 2009

New Panigram Blog!
May 8, 2009

I have been a bit remiss in my blogging lately due to an unscheduled trip back to the U.S. to get my visa upgraded. (Yes! I now finally have my investor visa!! I will finally pick up my work permit next week!)

I did want to write a quick post to announce that I have completely revamped the Panigram Resort website. There is a lot more information up there now and the look and feel is more professional. Plus, I have started a new blog for Panigram Resort. Right now the subscription process is a bit awkward (we are still tweaking several things on the site), but if you want to subscribe to the Panigram Resort blog, click the photo of the yellow mustard field that says, "Sign up to be notified when Panigram opens". There you can select if you want to receive a resort opening notification and/or subscribe to our blog.

To avoid spamming everyone, I will just be sending out a monthly digest notification to blog subscribers so they can see the new postings for the month.

Other exciting news, Panigram's Responsible Hospitality page now ranks 13th on Google's results list (second results page). Since this is our mantra, I am happy that it ranks so prominently. Maybe it will even make it to the first page soon!

I have had more press lately too. You can check out the latest news in the Panigram Press Room.

Finally, I have also created Facebook and Twitter accounts for Panigram Resort:

Panigram Resort on Facebook: Become a fan of the Panigram Page!

Panigram Resort on Twitter: Get our tweets!

In the next few weeks I will be continuing my blog postings on company formation in Bangladesh and rammed earth mud construction...

Thursday, March 19, 2009

Rammed Earth Construction Part III - Preventing Erosion
February 29, 2009

(For a list of all of the Rammed Earth Construction blog entries, go to the Index Page.)

Coming soon!

This is Part 3 in a 6 part blog series. For a list of all blog entries on rammed earth construction, please see the index page.

Tuesday, March 10, 2009

Rammed Earth Construction Part II - Mixing the Mud
February 28, 2009

(For a list of all of the Rammed Earth Construction blog entries, go to the Index Page.)

Selecting the right mud mixture is key to building a successful, durable mud or rammed earth building. Different kinds of earth have different qualities, and mixing them in the right ratio is what provides cohesion. First, here is a brief overview of the different types of mud that we will be using:

AGGREGATE
The aggregates will bear the weight of the walls and strengthen the structure. Any of these aggregates can be used in rammed earth construction. You should chose the one that is most easily available in your area. For our rammed earth project we used both pebbles and brick chips.

1) Pebbles
The pebbles are about 1/2" to 1" in diameter. Pebbles are large (comparatively) and round; like marbles, if we pile them on top of each other, they will just roll apart. Consequently we need other types of earth to adhere the pebbles together.


2) Brick Chips
This is a readily available form of aggregate in Bangladesh as there are many brick fields. The brick chips are also 1/2" to 1" in diameter. Though they are not as round and smooth as the pebbles, they will also slide if merely piled on top of each other.


3) Crushed Concrete
This is a great way to recycle old buildings. Pieces of old, crushed concrete (or rubble) can be ground into 1/2" to 1" pieces and used as aggregate.

4) Gravel
This is another good form of aggregate that is often also used in concrete. Gravel is not very easy to come by in Bangladesh, however.

EARTH
The earth is what holds the walls together. It is important to get the right mix of earth and aggregate so that you minimize shrinkage (and therefore cracks) and erosion while maximizing strength and durability.

5) Sand
Sand is important for strength, cohesion, and shrinkage. As any child who has ever played on the beach can tell you, wet sand is a great building material. The water molecules act as a glue that holds the sand together. Wet sand can be molded into an infinite variety of shapes. When the water evaporates, however, the bonds are broken and the sand reverts into a shapeless pile. Conseqently, another type of earth is needed to hold the sand particles together...

6) Clay
Clay is a very plastic material. Because of its oblong shape, clay particles slide easily over each other. Wet clay slides the easiest (picture two pieces of glass with a thin layer of water between them and you will get the idea.) When the water dries, the clay shrinks, bringing the clay particles closer together and making it very hard. Because clay shrinks quite significantly, however, many cracks will form in the wall (picture a dry field of mud) unless aggregate is added. There are different types of clays ranging from sandy to sticky. The stickier the clay, the tighter the bond, but the more cracks you will have. On our project we used two different types of clay: "sticky clay" and clay that we dug up from the project site which was redder and sandier. You can tell how sticky the clay is by squeezing it in your hand. The more it holds its shape, the stickier the clay is.

The trick is to find the right mixture of clay, sand, and aggregate. A good rule of thumb is 40% aggregate, 30% sticky clay, 30% mud from the site. You should do tests, however to determine what the right mud mixture is for you.

On our project, the "sticky clay" was too wet to mix in with the aggregate and site mud. (If it is wet, the mud just clumps together and doesn't blend in with the other components.) We tried to break it into smaller pieces and set it in the sun to dry, but it was too labor intensive to be able to practically implement on a large scale. We did end up using the dried sticky mud to create the clay plastering, however. Our final ratio was 5 parts clay from site, 1 part brick chips, and 1.5 parts pebbles. Because we had to omit the sticky clay, our mixture was not as strong, so we had to insert more erosion breakers. (See Part III - Preventing Erosion for more information.)

TESTING YOUR MUD
There are several tests that you can do to determine what type of mud you have and how well it will work in rammed earth construction.

1. Squeeze Test
This is a simple test to determine the quantity of clay in your mud. You take a handful of moist earth (not wet, not dry) and squeeze it. The degree to which it holds its shape after you open your hand is an indicator of how much clay is in the mix.

Red Earth Squeeze Test
This earth was taken from the project site. Unfortunately the photos are a bit out of focus, but I think you can still get the idea...


To determine how much clay is in the earth, squeeze it tightly in your hand.

Because it retained its shape, there is clay in the soil.


Sticky Clay Squeeze Test
This clay was brought in from another site. It is true "sticky" clay.


You can see that it keeps its exact form after performing the squeeze test


2. Rolled Arch Test
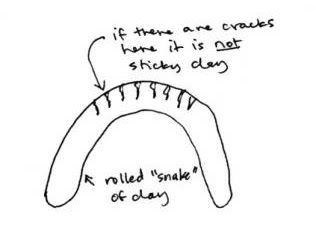
This is a simple test to determine if your clay is "sticky clay". Take some moist clay or earth (again, not wet, not dry) and roll it into "snake" then bend the "snake" into an arch. If there are cracks at the top of the arch, it is not sticky clay.

3. Shrinkage Test
This is the best test to do to see if your mud mixture will be appropriate for your walls. I suggest making several different mud mixtures altering the quantities of the various components and then do shrinkage tests for all of them to see which one works the best.

To do a shrinkage test, you put your mud into a cylindrical container and ram it. We used large plastic pipes that were cut on the sides and then bound back together with rope. Using two pipes (so the mud did not come out of the seams) worked the best. You add a layer of mud mixture to the depth of your knuckles if you stick your hand into the dirt. Then you ram it until it sounds more like you are ramming stone than mud. You add another layer and continue ramming until the pipe is filled.

When the ramming is finished, remove the pipe. Then on the top of the rammed sample draw a ten centimeter line - clearly marking the ends. (Make sure the measurement is exact.) Then let the sample dry for a couple of days and come back and re-measure the line. The rammed earth should shrink less than 1% if properly mixed.

If your sample shrinks too much, try using less water or adding more sand. It is also better to let the sample (and your walls) dry slowly instead of quickly in the sun.

Shrinkage Test Sample
This mud was rammed in a cylinder and then marked with a 10 cm line.


CREATING THE OPTIMAL MUD MIXTURE
In order to create the optimal mud mixture, it is important to understand the properties of the various materials and how increasing or decreasing their quantities will affect the performance of your mixture.

The most important component of the mixture is the clay. The shape of the clay particles gives it its unique properties. Clay particles are long and round, so they slide over each other easily when they are wet. When the water evaporates, the particles move closer together, making the clay very strong.

Furthermore, the dried clay acts as a water barrier. The molecules pack so tightly that water is not able to enter the wall.

The degree of the stickiness of the clay depends upon its shape. Thinner, oblong shapes are more sticky thank round shapes.

While sticky clay is very strong, it also cracks and erodes more easily. It cracks because of the shrinkage. To decrease shrinkage, aggregate is added. The more (and larger) aggregate you have, the less shrinkage occurs.

While mixtures of 100% clay or clay with only sand would not be good for exterior walls, they would make very strong compressed bricks. (Rammed earth bricks are another great, sustainable building material. You can even make interlocking bricks that eliminate the need for mortar.)

Erosion occurs because of the speed of the water running down a wall. Clay only walls are very smooth, so the water builds up speed and takes particles off of the wall as it runs down. Clay is naturally water resistant, however, so a clay and sand wall would actually have more erosion than a clay only wall even though it would be slightly rougher because the shape of the sand breaks some of the "locks" that the clay particles have with each other. Using a large aggregate, like pebbles or brick chips, however would significantly roughen the wall surface which would decrease erosion. (See Part III - Preventing Erosion for more tips on how to reduce erosion.)

So when creating your mud mixture, you should consider the following factors:

1. Will the wall be inside or outside?
Inside walls can have more clay and less aggregate because they will not get wet (and therefore will not be subject to erosion).

2. How many external erosion barriers will you have?
External erosion barriers are architectural elements that break the speed of the water. (See Part III - Preventing Erosion for more details.) The more erosion barriers you have, the less sticky the clay you can use and/or the less aggregate you will have to add. Because we were not able to use the sticky clay on our project, we had to add more external erosion barriers to compensate.

3. What type of mud is available to you?
One of the primary goals of using rammed earth construction techniques is to be sustainable. Consequently you should try to use as many materials from on the site as you can. (This will also help reduce your costs.) Determine what you will need to add to your local mud to make it work for your project.

After you have created your mud mixture, do some shrinkage tests to fine tune your mix.

MIXING THE MUD
Finally, when you actually begin mixing the mud, you want to mix it in smaller batches to make sure that all of the different elements are well blended. (We used small baskets called "tukri" to measure out our parts.) You also need to make sure that you wet the aggregate before you mix it with the mud. Wetting the aggregate makes the mud stick to the sides of it, making it "dirty" for optimal mixing.

The clay should be fairly dry when you first mix it, however. If it is too wet, it will clump together and will not mix in with the other elements. We ran into this problem on our project site and attempted to dry out our sticky clay.

Drying the Sticky Clay
Several of the local children joined us to make mud paddies to dry out the sticky clay. Unfortunately, even with all of the extra help it would have taken us weeks to get enough dried clay to add to the walls. (And our workshop was only 10 days!) Consequently, we decided to just use the clay from the site in our mud mixture and we compensated for the reduced strength by adding additional external erosion barriers.


We also "graded" our earth before mixing it. We put it through a metal screen to separate out the larger particles and then used the fine clay particles in our mixture. Again this helped us achieve an even consistency and a good mix.

Grading the Mud
We poured the mud through a wire sieve to separate the course particles from the fine.


After you have mixed your mud, you want to make sure that it is damp. Add just enough water so that when you squeeze a handful of your mud mixture together it retains its shape. If the mud is too wet, however, it will be difficult to ram.

You should mix your mud mixture a day before you want to actually ram it. Be sure that you cover your mud mixture so that the water doesn't evaporate. Waiting over night allows the water to more fully penetrate into the clay making it more malleable and ideal for ramming.

We mixed the mud both by hand and using an electric mixing machine.

A NOTE ON ADDING CEMENT
You will notice that cement is not listed above under the possible mud mixture elements. Many people mistakenly believe that adding a little bit of cement to the mud mixture will make it stronger. The opposite is actually true. Because cement particles are small and round, they actually interfere with the natural locking mechanism of the clay particles. As an analogy, picture our two plates of glass with the water between them acting as the clay particles. They move smoothly and when the water evaporates the plates move together and become stronger than just the single glass plate. Now put some sand (our analogy for cement) in between the two glass plates. Not only do they no longer move as smoothly, but when the water evaporates, the two plates of glass no longer sit close together. If we were to apply pressure to them, they would probably crack because of the sand holding them apart in some places.

The moral of the story is: do NOT add cement to your mud mixture!

CLAY PLASTERING
Clay plastering is used to bind elements (foundation, bricks, lintels, etc.) to the rammed earth. Because the clay plastering is wet and is made with sticky clay, it gets into all of the crevices of both the mud and the attaching element, working like a glue.

Here is the recipe that we used for the clay plastering:
  • 1 part sticky clay (dried and ground into a powder)
  • 1 part red clay from site (sifted through a sieve until fine)
  • 2 parts sand
  • water
Mix all of the dry elements together until well blended. Form into a pile and hollow out the center of it. Fill the center hole with water. Then bring material up from the sides to fill in the water hole. Let this sit for a couple of hours so the water can really sink in to the sticky clay. Then come back and mix everything together, adding more water until the plaster is the consistency of clay slip (if you do ceramics) or fairly wet mortar (if you are a construction worker). Make sure you cover the clay plastering when you are not using it so the moisture doesn't escape. The longer it sits with the water, the better the plastering will be because the clay will be able to better absorb the moisture. It is best to prepare the clay plastering in a bucket 1-2 days before you need it.

Mixing the Plastering
After the dry elements have been mixed, form a pile with a hole in the middle.


Adding Water
Add water into the hole, then bring up the sides to cover the water and let it sit for a few hours. Then come back and mix it with more water until it is the consistency of ceramic slip.


This is Part 2 in a 6 part blog series. For a list of all blog entries on rammed earth construction, please see the index page.

Rammed Earth Construction Part I - Creating the Foundation
February 27, 2009

(For a list of all of the Rammed Earth Construction blog entries, go to the Index Page.)

The foundation construction that Martin and Anna developed is the key to durability of the mud structures. A concrete and brick foundation with a vapor barrier prevents the moisture from the ground from seeping into the mud walls, weakening them from the bottom. Traditional Bangladeshi mud structures build the mud walls directly on the ground. The monsoon rains and annual flooding severely weaken the lower portions of the walls making them susceptible to cracking, collapse, and pest penetration. The brick foundation, however, goes two feet down into the ground and two feet above the ground, raising the walls above the flood plain. A vapor barrier keeps the lower portion of the walls dry. There are mud buildings in Europe that are still standing after over a hundred years.

To create the foundation:
  • Dig a foundation hole
  • Build a four foot high course of bricks with cement mortar. The walls should be approximately two feet thick.
  • Plaster the walls with a layer of cement
  • Put a vapor barrier down on top of the brick foundation.
  • On top of the vapor barrier you need to put a thin (half cm) layer of clay plastering; this helps the rammed earth stick better to the foundation. (See Part II - Mixing the Mud for clay plaster recipe.)
Vapor barriers can be made from:
  • Polythene sheet (use a double layer and make sure there are no holes in it),
  • Coat of bitumen,
  • Layer of ferro cement (steel mesh with a coating of cement over it; this is what we used on our project)

Building Foundation
The foundation had been prepared for us when we arrived. It is constructed of bricks with cement mortar and a thin plastering of cement on the outside. The top has a layer of ferro cement.


Detail of Ferro Cement
In this photo you can see the steel mesh of the ferro cement. The craftsmanship of the foundation was quite poor; if the foundation was properly constructed you should not be able to see the mesh! Exposed mesh like this will eventually rust and create many problems down the road.


Illustration of the Foundation Construction
An illustration I did of the different parts of the foundation.


This is Part 1 in a 6 part blog series. For a list of all blog entries on rammed earth construction, please see the index page.

Rammed Earth Building Workshop
February 27, 2009

I recently had the pleasure of attending a 10 day mud workshop with my friend Anna Heringer and her mentor Martin Rauch sponsored by the BASE Habitat, the Institute of Architects in Bangladesh (IAB) and the Housing and Building Research Institute (HBRI). They taught us how to construct a rammed earth building and we got to test our education by constructing a small structure at HBRI in Dhaka. I think that mud construction could be the future of architecture in Bangladesh. It really is the best construction medium for this climate because the thick walls keep the interior temperature and humidity fairly constant. Plus, it is a durable, renewable, and readily available building material here. I am happy to share all that I learned in the workshop here on my blog.

Because it is a lot of information, I will be breaking the information down into several different blog entries indexed here:

Rammed Earth Construction Part I - Creating the Foundation
Rammed Earth Construction Part II - Mixing the Mud
Rammed Earth Construction Part III - Preventing Erosion
Rammed Earth Construction Part IV - Ramming the Earth
Rammed Earth Construction Part V - Ring Beams, Lintels, and Windows
Rammed Earth Construction Part VI - Rammed Earth Floor

Thursday, February 12, 2009

Company Formation in Bangladesh - Part 4
BOI Registration
February 12, 2009

(For an index of all of my Company Formation in Bangladesh blogs, click here: Forming a Company in Bangladesh)

Now that fundraising for my resort is progressing, I have to make my bank account an operating account so that I can take money out. If you recall from previous company formation posts, until all company registration/ work permit issues are completed, you can only open a non-operating bank account, which means that you can put money in, but you can't take money out!

I knew that the next step in resolving this issue was to get my Board of Investment (BOI) registration, but after meeting with Mamdood Alamgir, the Director of the Industrial Division of BOI, I learned that in order to register with the BOI, I would need to have my land. Of course, in order to buy my land I need my equity money and to take my equity money out of my bank account I need an operating bank account, but to get an operating bank account I need BOI registration - so the "chicken and egg" cycle starts again!

The last time I spoke with him he mentioned that a lease or registered baina would work as well as a purchase deed. Because a registered baina costs 1/3 the price of the land, I decided to take out a five year lease for just one bigha (out of the 60 bighas) of the land that I intend to purchase. I was hoping that this would satisfy the BOI requirement for some sort of land prior to registration.

I collected all of the documents on their list and went to BOI to register. Of course, when I sat down with Mr. Alamgir again, the rules and the form had changed and I was now missing my tax ID number (TIN) and my trade license. I was told by the group that I initially hired to register my company that I couldn't get these until I had BOI registration. (Another chicken and egg cycle.)

The Director assured me that I could get these things, however, if I applied for them in the district where the resort would be located. Dubious, I had no choice but to agree to try to get those items before returning to the BOI to register...

Items Needed for Bangladesh Board of Investment (BOI) Registration:
Here is a list of items that you need to submit for BOI Registration. Be sure to check with BOI before submitting, however, as the list and forms seem to change frequently! ALL documents need to be stamped with the corporate seal and signed by the Managing Director or Chairman.
  • BOI Application for Registration of a Foreign Investment Project Form (2 copies)
  • Background of Promoters (name, permanent address, mailing address, position in company, nationality, experience) (3 copies)
  • Résumé of officers (Managing Director at a minimum) (3 copies)
  • Machinery/ Equipment List (3 copies)
  • Certificate of Incorporation along with Memorandum & Articles of Association (1 copy)
  • Copy of Trade License (1 copy)
  • Copy of TIN Certificate (1 copy)
  • Attested copy of lease agreement, deed of sale, or registered baina (1 copy)
  • Project profile with financial statements (if the company is greater than 50 million taka) (1 copy)
  • Pay order/ bank draft to: Executive Chairman and Member Secretary for the registration fee
Fees for BOI Registration
As of this writing, the fee schedule is as follows. Definitely check with BOI before ordering your bank draft, however, as the amounts may have changed.

Project Cost up to 100,000,000 Tk = 5,000 Tk
Project Cost up to 250,000,000 Tk = 10,000 Tk
Project Cost up to 500,000,000 Tk = 25,000 Tk
Project Cost up to 1,000,000,000 Tk = 50,000 Tk
Projecdt Cost over 1,000,000,000 Tk = 100,000 Tk

Updating changes in BOI registration costs 1,000 Tk each time.

Getting a Bank Draft
Getting the bank draft for the Registration Fee, was, of course, a bit tricky. Banks will not issue a bank draft for money unless you have a bank account with them (that you can take money out of!) Fortunately, earlier I had opened a personal taka bank account that I could take money out of. Sadly, I can not put money into this account, unless it is a wire transfer in or a salary check. (Yes, crazy as it sounds, I have one Bangladeshi bank account that I can put money into, but not take it out of and one Bangladeshi bank account that I can take money out of, but not put money into!)

Fortunately, the day I went to the bank (where I have my personal account) the man at the counter was sympathetic. I did not want to waste time or the money going through a wire transfer from the U.S. Of course I did not know about the "you can only get a bank draft by taking money out of your own bank account rule", so I did not have enough money in my account to cover the registration fee. Luckily, I had just withdrawn some money from my U.S. ATM card and the banker was able to accept that receipt as proof that I had just brought the cash that I was using into the country.

Unfortunately, I think that having a personal bank account here is the only way to get this bank draft. It is relatively easy to open a foreign currency (i.e. dollar) bank account in Bangladesh from what I understand, but opening a personal taka account is much more difficult (another "chicken and egg" scenario!) I was able to do it because I originally came to Bangladesh on a student visa. You might check with the bank to see if you could get a bank draft from a foreign currency local bank account though...

Bangladesh Tax ID Number (TIN) and Trade License
After the BOI rejected my application because I did not have my tax ID number (TIN) and trade license, I contacted my local agent in Jessore to see if he could get them for me. He found out that we had to get our tax ID number first, and that as a foreigner I could not get that in Jessore (the district where the resort will be developed.) I could either apply for it in Khulna (the main town of the division that Jessore is in) or Dhaka (the capital city). Since Khulna is closer to Jessore, I had my agent go there. He was able to get the TIN quite quickly (the next day). There was no fee for the TIN, but apparently we had to pay a 6,000 Tk "expediting fee". Bangladesh is one of the most corrupt countries in the world, and I would love to say I flat out refuse to pay bribes, but sometimes you just can't get business done unless you do!

With the TIN we were able to apply for our trade license. The BOI guys told me that I had to apply for that in the upazila where the resort would be built. My agent had reservations about applying there, however, because the land owners don't know that it is a foreigner buying the land, and we don't want them to find out until we have purchased all of the land, because otherwise the prices will go up a lot! Fortunately, Koli is quite smart and resourceful, so when he applied for the trade license he told them that HE was Kristin Boekhoff! I had a good chuckle about that since a few months ago I had disguised myself as a Bangladeshi man to go look for land, and now a Bangladeshi man was disguising himself as a white, Christian woman in order to get a trade license! Ah, what we will not do to get this project off the ground!!

The trade license application took a little bit longer, because the councilman had a death in his family and was out of the office for a few days. I did get the license about a week later, for 1,000 Tk - plus a 2,000 Tk donation to the Chairman's "poor fund" (as Koli calls it). I am not at all happy about these bribes, but I honestly don't know what I can do about it. If I don't pay, I can't get my trade license which means that I can't start my company...

To apply for a trade license you need the following:
  • a certified copy of the company’s articles and memorandum of association
  • a copy of the certificate of incorporation
  • statement of bank solvency (I used a copy of the initial bank statement for my corporate account - the one that showed the two initial wire transfers into it)
  • the company’s tax identification number certificate
  • a copy of the rent agreement for the company’s office
  • three passport photos
  • particulars of the managing director (name, marital status, address, parent's names, etc.)

Land Requirement
Originally Mr. Alamgir told me that I could use a lease, even for an office space, to fulfill the BOI land requirement. When I went to him with the lease agreement for the one bigha for five years, however, he told me that would not be sufficient to operate a resort. I explained to him that I knew that, but that I couldn't buy all of the land until I get my equity money, and I can't use my equity money until I get an operating bank account, and I can't get an operating bank account until I get my BOI registration!

Fortunately, he understood my dilemna and said that he would try to help me out... (And no bribe was needed! At least there is one honest man in the government!)

Submitting the BOI Registration
Surprisingly, after I did have my trade license and TIN (and all the rest of the required info), submitting the BOI Registration Application was quite easy! I just went to the reception area on the 19th floor, handed it in, and waited while the woman there entered the information into her computer. When she was done she gave me a receipt with a number that I could use to check the status of my application online. Yes! Online!! (http://www.boi.gov.bd/boi_service_tracking.php) Sadly, the online status doesn't seem to be working for me; I keep getting a page load error... but, theoretically it is still exciting!

I was told that it should take 10-12 business days to get BOI registration. After that, I apply for my investor visa...

Monday, January 19, 2009

Hamida Goes to Cooking School
January 19, 2009

We decided to send Hamida to an Italian cooking school to increase her food repertoire. We told her that we would pay for the classes and if she learned well and did a good job of preparing food for us for three months we would increase her salary by 1,500 Tk/ month (which is a significant increase in salary for her!) She was extremely excited by this. I think that cooking is her favorite part of her job and she likes learning how to cook new things. She was also very happy about the prospect of increasing her salary, so she told us that she would work really hard and learn the new menu.

Today was her first class. I was quite surprised to learn that the class was entirely in English because we were told that there would be someone there to translate into Bangla for her. The foreign language didn't seem to phase Hamida though. She was very excited by the class and told us that she was trying very hard to learn. She proudly showed me her new Italian cookbook (which thankfully is in both Bangla and English) and pointed out which items she learned to cook today.

Normally Hamida works from 8am-1pm and then goes home. Since we really depend on her now, it would be very troublesome for her to go without working for two weeks, so she will now go to school in the morning and then come to our house in the afternoon to do her regular chores. Tomorrow she will cook her first Italian meal for us. I am so excited!